Add New Fixtures
The Add New Fixtures Window is located in the Setup, column Show, Patch & Fixture Schedule, Add New Fixtures.
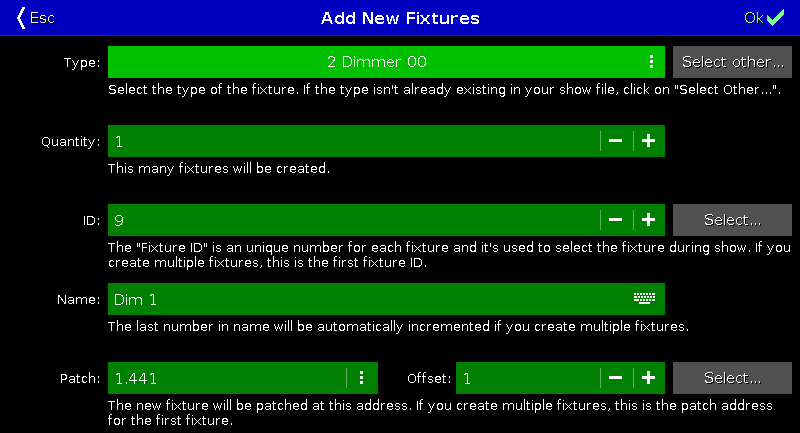
Figure 1: Add New Fixtures Window
In this view, you select your fixture type, the quantity, the fixture ID, the fixture name, the patch address, and the offset.
There are six edit lines.
To confirm your settings and add new fixtures, tap  in the title bar.
You are back in the Patch and Fixture Schedule.
To leave the Add New Fixtures Window, tap  in the title bar or Esc on the console.
You are back in the Patch and Fixture Schedule.
The type edit line contains a drop down list with four standard fixture types
- 2 Dimmer 00
- 3 LED - RGB 8 bit
- 4 LED - RGBA 8 bit
- 5 LED - RGBW 8 bit
and those which are already in the current show file exist.
To open the drop down list, tap the three dots  in the edit line.

Figure 2: Drop down with standard fixture types and the fixture types in the show file
To import another fixture type from the library into the show file, which is not in the drop down list, tap Select other… on the right.
It opens the Import Fixture Type Window.
Quantity
Section titled “Quantity”The quantity edit line displays how many fixtures will be created.
To select the quantity, tap the plus or minus.
The ID edit line displays the next available fixture ID.
To select a fixture ID, tap the plus or minus.
To get an overview about assigned and available fixture IDs, tap Select… on the right. The Select Fixture ID(s) Window opens.
The name edit line displays the name of the fixture.
To edit the name, tap at the keyboard  . The edit name window opens.
If you create multiple fixtures with the same name, the name will get a consecutive number at the end of the name.
The patch edit line displays the next available patch address.
To select another universe or address, tap the three dots in the edit line. The drop down opens.
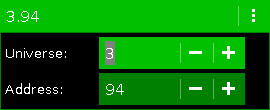
Figure 3: Select DMX universe and address
To get an overview about assigned and available DMX addresses, tap Select… on the right. The Select DMX Address… Window opens.
Offset
Section titled “Offset”The offset displays the selected patch offset.
The offset is the free DMX address space between one fixture and another fixture. A patch offset gives you a better overview about the fixtures and their patch address.
To patch a few fixtures and with a start address of x.xx1, select a patch offset of 10.
To select the quantity, tap the plus or minus. By default the offset is 1.
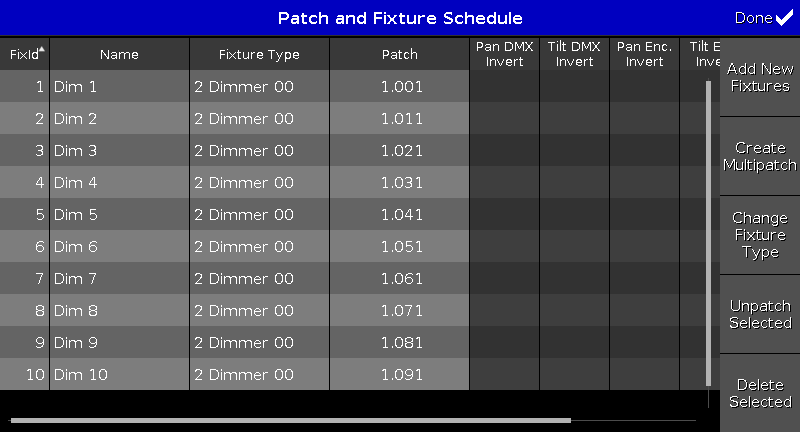
Figure 4: Patch and Fixture Schedule with Offset of 10
Encoder Bar Functions
Section titled “Encoder Bar Functions”
Figure 5: Encoder Bar Add New Fixtures Window
Type:
To scroll in the drop-down list from the edit line Type, turn the encoder left or right.
To open the Import Fixture Type Window, press or tap the encoder.
Quantity:
To select the quantity in the edit line Quantity, turn the encoder left or right.
Fixture ID:
To select the fixture ID in the edit line ID, turn the encoder left or right.
To open the Select Fixture ID(s) Window, press or tap the encoder.
Patch Break 1:
To select the DMX address, turn the encoder left or right.
To open the Select DMX Address… Window, press or tap the encoder.
Patch Offset:
To select the patch offset, press and hold  and turn the encoder left or right.
To open the calculator to select the patch offset, press and hold and press the encoder.